Correcting the mileage of your car’s odometer is legal, but it becomes illegal when you misrepresent or falsify the vehicle’s initial mileage. We have some that use the information to increase the price quote of the car. Clocking the vehicle with a digital odometer is not a complicated task since it involves replacing clusters with lower mileage.
However, the entire process can be trickier when you don’t have enough information. The procedure requires you to dissemble cluster and solder SMD components. Use our guide to navigate through the entire process comfortably and correctly. Do some prior practice before getting yourself into a mess; handle the components with great care.
Ultimate guide on clocking a car with a digital odometer
Step 1: Introductory part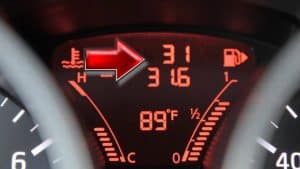
Let’s say you want to either change the appearance of the needles on your dashboard or remove the problematic cluster. Primarily, Japanese vehicles store their mileage on the collection and not ECU. Therefore, the initial vehicle’s mileage will appear on the dash.
To comfortably navigate through the process, you need to assemble some useful tools like:
- 8-pin DIP socket
- Serial programmer
- Breadboard
- Hookup wire
- 4.7K ohm resistors
- 5V Zener diodes
- Screwdrivers
- Soldering iron, desoldering pump, and a solder
- Windows XP Computer and serial port
- Wire strippers
- Female serial port header
- 5V from the computer power supply
- Serial programming software, i.e., PonyProg freeware)
Step 2: Disassembling the Instrument Cluster
After removing the Instrument Cluster from your vehicle, pull some tabs to detach the front fascia and plastic cover. Remove the needles too, but you need to pull them carefully. Use gloves to touch the gauge’s black face because it’s a fingerprint magnet. Detach the white backing after removing the meter.
Step 3: Soldering Hookup wires
Based on the datasheet, you will have to connect pins 8, 5, 3, 4, 2, and 1 for programming. Solder a few hookup wires for you to get the details off the chip. Before reading from the chip correctly, short the crystal on the top-left of the EEPROM.
Step 4: Program Hardware Setup
This step is a bit challenging as it involves connecting the EEPROM programmer to your computer. The unit interfaces via the RS232 serial port. It consists of three 5V Zener diodes and three 4.7K ohm resistors, breadboard and 22 AWG hookup wire.
Using the PonyProg software can be tricky as you have to read the information and save it on the odometer chip. Writing the EEPROM requires you to detach it from the board; you can’t programme it in the circuit.
Solder the wires to your new chip and connect it directly to the programmer without interfering with the write function. Doing so is essential as it allows you to connect and disconnect your chip to the odometer board easily.
Step 5: Programming: Read from the EEPROM

Here, you have to use PonyProg software that is a free-serial device programmer. The software is known for reading and writing to the COM port, directly to the chip. Buy an EEPROM programmer if your PC doesn’t have a serial port.
Please navigate through the setup menu, ensuring it’s programmed to read from COM1, SI Prog I/O, and serial port. More so, probe the port, ensuring it reads the serial programmer. Toggle through the menu and choose Microwire 93C56, which’s compatible with the L56 EEPROM chip.
Click on Device, and then Read to get information from the chip. Remember, the information from your chip will be automatically downloaded in HEX format.
Step 6: Decode the Odometer Dump
At this juncture, you can rarely save the odometer dump; writing it to the new cluster is also not easy. Try to decode it if you have the skills.
Step 7: Write information to the EEPROM chip
After finding the correct mileage value, go back to your PonyProd software and then click Edit Buffer Enabled. Select the bit you wish to edit and insert in the new mileage value. After clocking the mileage, detach the EEPROM from the programmer and then hook it up to the odometer board for testing.
Step 8: Prototyping
If you had connected a hookup wire on the original odometer board, temporarily attach it to the EEPROM chip to determine whether the car works. You can use an alligator to link the six hookup wires to the EEPROM. Remember, this is only for testing before soldering the chip back.
Put it on the odometer, and it will display the distance coverage you wanted. Sometimes the odometer can also display the external temperature on the EX-L cluster.
Step 9: Reassemble all components back up
After you have noticed everything is working, now return the new programmed chip to the odometer board; in occasions where you already soldered on the ECU board, de-solder it. Directly attach back the new chip back to the board through soldering.
Be careful not to damage the pads; if they got destroyed, solder a patch wire to complete conductivity. Reassembling the Instrument Cluster involves installing back the needles into their specific positions.
Step 10: Results
After everything is in place, connect the unit back on the car and start it up.
FAQs About How to Clock a Car With a Digital Odometer:
- How can someone know the digital odometer has been interfered with?
Some experts recommend searching for smudge or fingerprint marks on the odometer. If you spot such indicators, your vehicle’s digital odometer might have been tampered with.
- Is clocking the mileage of the vehicle illegal?
Yes, it’s illegal to alter the odometer mileage and sell the car without informing the buyer. However, if you plan to do it for fun, it’s legal.
- Can I clock my BMW?
Yes, but you must replace some worn out parts like brakes, stones, chips, tires etc.
Conclusion
The above information is handy as you can use it to clock your vehicle to 0 miles (brand new car). However, you should use the information for fun and not increase the asking price of a car. If you have mechanical skills, you can change the mileage of your vehicle; this is for fun and not for trading.
Of course, you can use the above procedure to program anything you wish.